Reference Page
DIAGNOSIS:
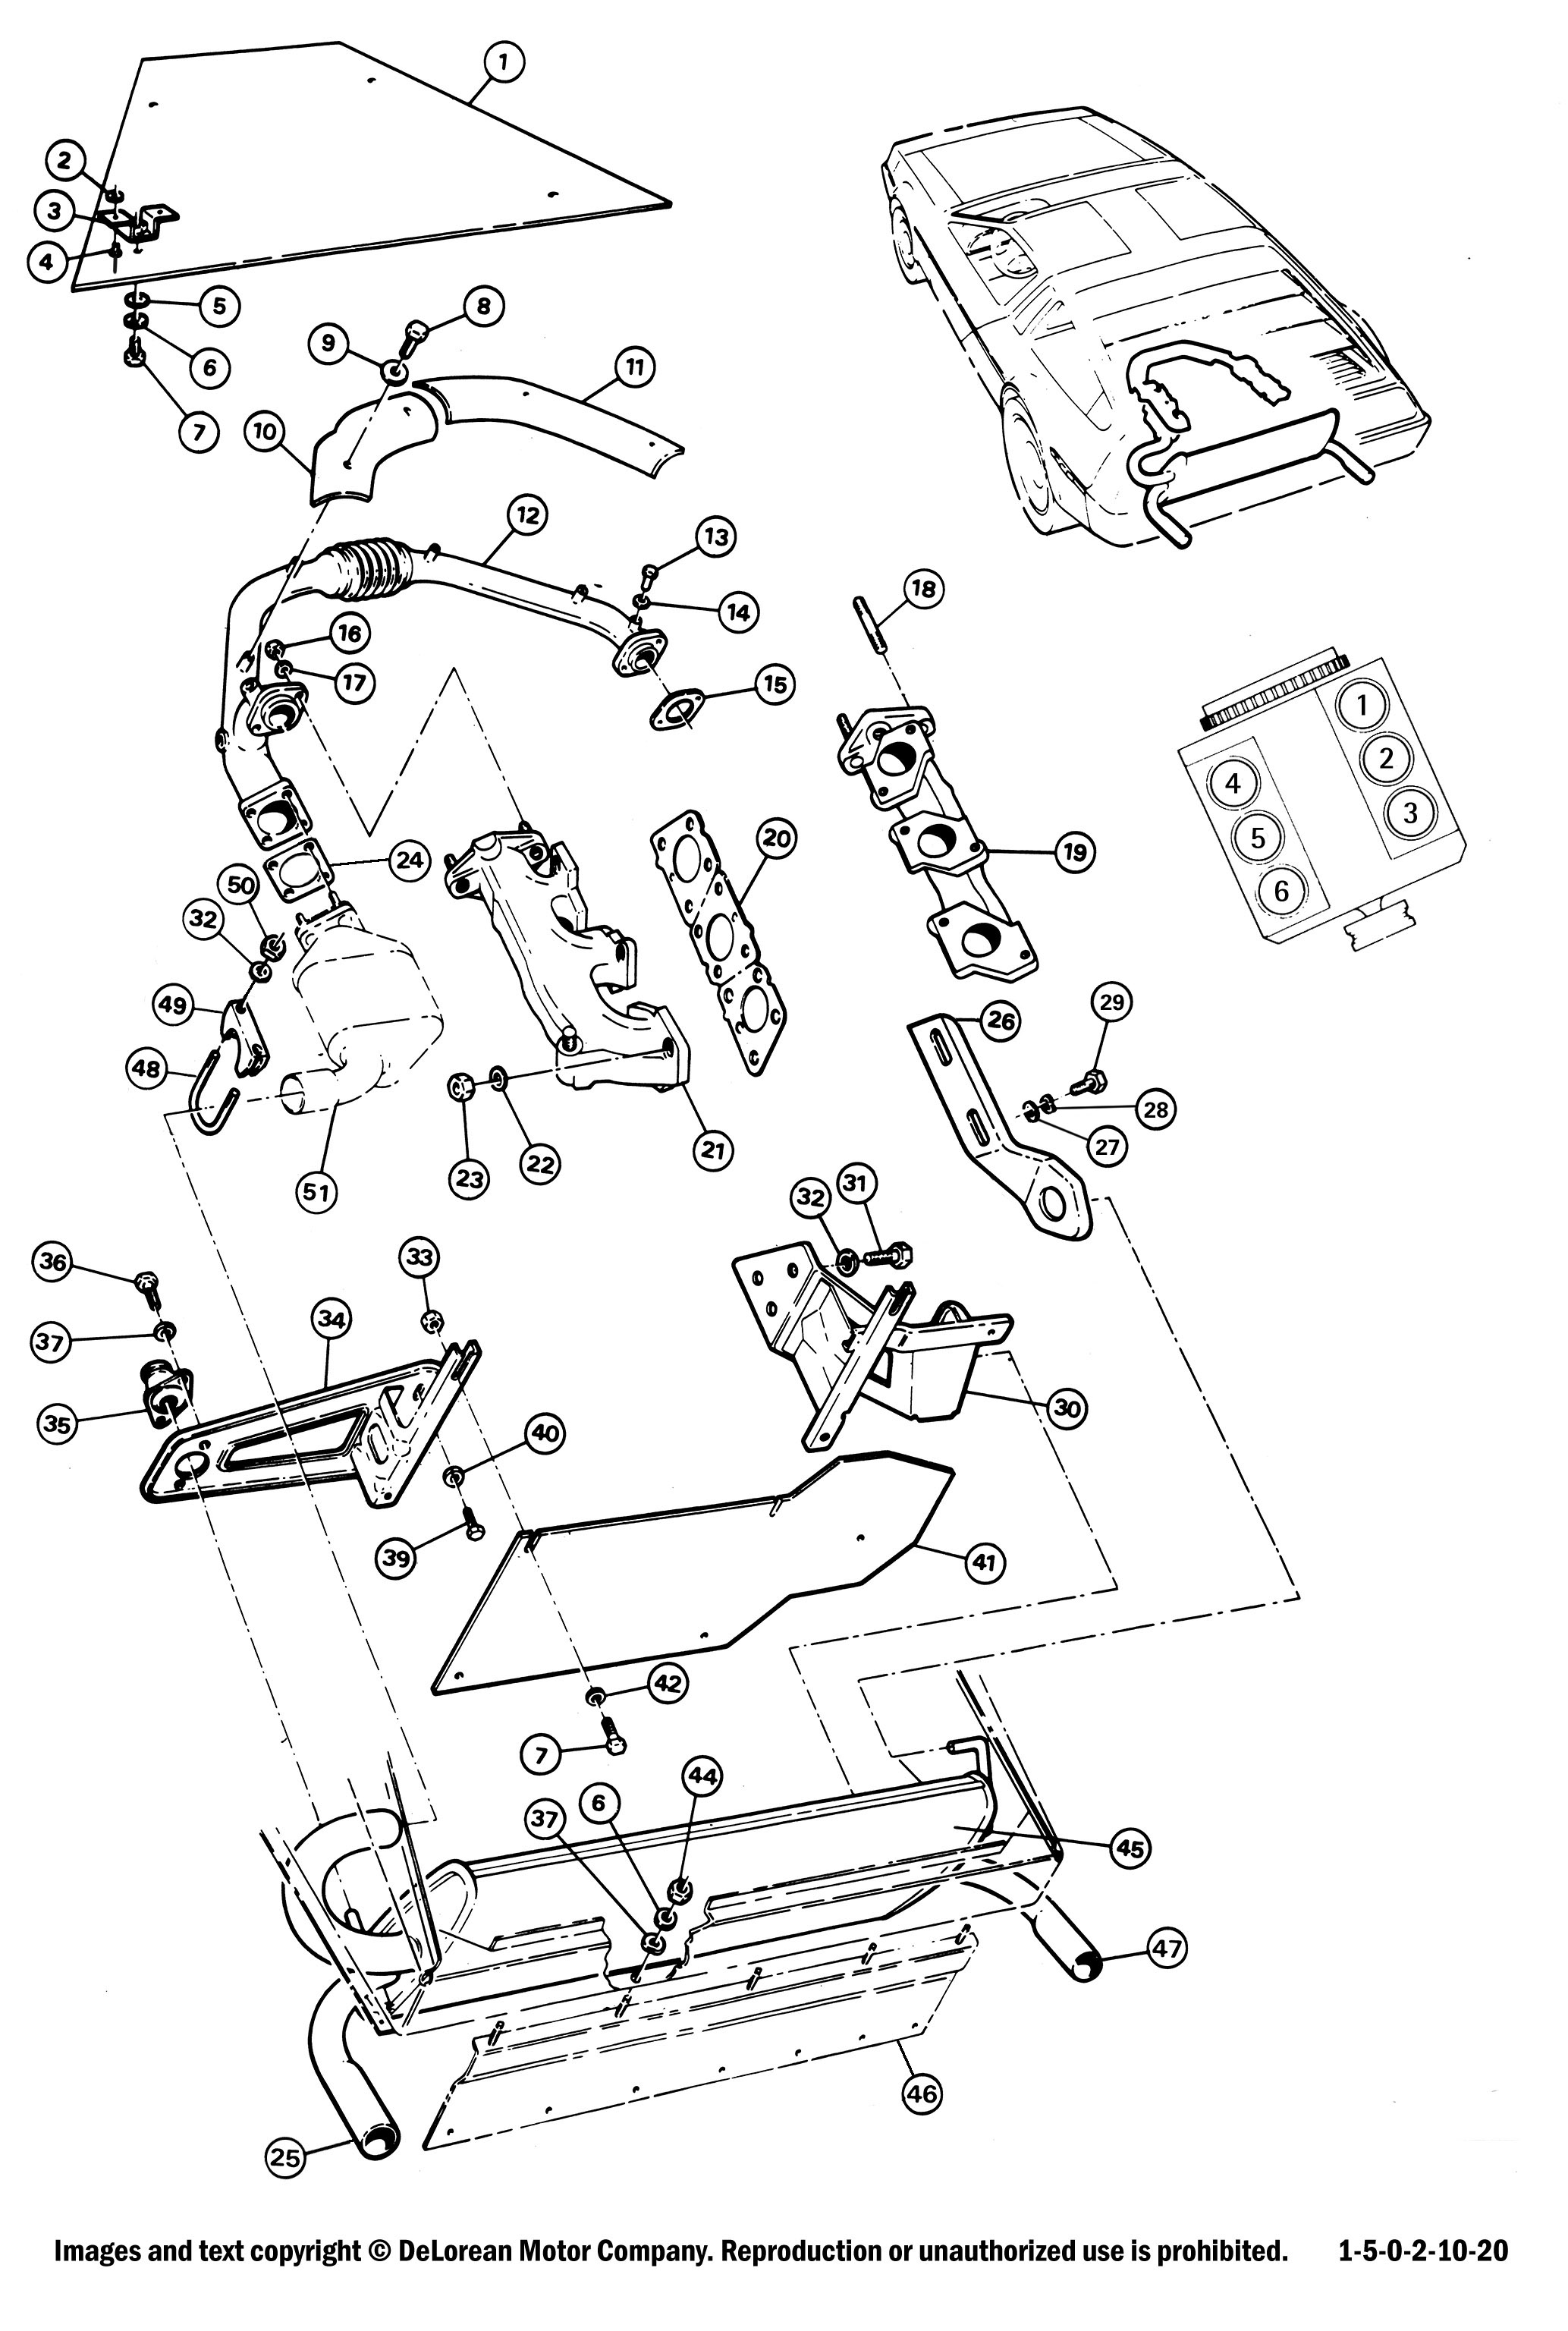
The DeLorean engine will usually require a change of exhaust gaskets at least once in its life. The combination of the manifolds' cast iron, the aluminum of the head, and the wide, frequent swings in temperature act to abrade and fold the gasket so that it breaches-most often on the exhaust port of cylinders number one and four, the hardest ones to reach.
The first indicator that this job is needed is that the engine develops a noticeable ticking sound, often mistaken for a noisy valve lifter. Initially this will quiet down as the engine warms up, but as the gasket continues to break down it will get louder. You can often see the bad gasket by inspection from under the car. It will be revealed by black burn marks on the cylinder head where the manifold is attached, and by looking through the unused attachment holes in the gaskets where it will be apparent that the hole in the gasket no longer lines up with the threaded hole in the head.
REPAIR PROCESS
This job is toward the difficult end of the "do it yourself" scale. Some skill working with rusted fasteners and an oxy-acetylene torch come in very handy here.
It is usually best to change both manifold gaskets. The crossover pipe must be taken away from the manifolds to allow either of them to be removed, so you may as well do both.
DMC sell kits PN K112259 (both sides) and PN K112258 (one side) that include all the hardware you could need for the job: nuts, washers, studs, and gaskets.
Step 1 - Remove the muffler. Disconnect the upper bracket (near the alternator), and remove the two lower brackets that are bolted to the engine. Remove the muffler clamp (plan to replace it). Once all the brackets are removed, slide the muffler to the left. It will disengage from the converter and fall out (HEAVY) so be careful with this step.
Step 2 - Heat and remove the four nuts holding the crossover pipe to the exhaust manifolds. New studs are included with the kits, but if possible you want to avoid breaking them especially if you are only doing one side of the engine.
OPTION - You can leave the converter attached to the crossover pipe and allow it to drop down a bit to provide clearance for the engine studs. The gasket for the cat is included in the kit in the event you need to replace it, but failure of that gasket is uncommon. Removing the nuts holding the converter to the crossover will often destroy the cat as the studs are difficult to replace.
CAUTION: When removing the nuts on the exhaust studs, be especially careful to avoid breaking the stud. The manifold will still come off, but you will be left with the extremely difficult and annoying job of drilling the rest of the old steel stud out of the aluminum head.
Step 3 - Our recommendation is to heat the nuts with an oxy-acetylene torch, one a time, and remove. Alternatively you can warm then slightly and apply a good penetrating oil to the studs and allow some time (up to a day) for it to absorb. Make sure that you get your socket squarely and fully onto the nut. Pull directly perpendicular to the stud. Do not use a universal adapter on the socket. That's the surest way to break the stud. Unfortunately, you may find that one or more of the studs is already broken and is now stuck in the manifold.
Step 4 - Once the manifold is off, you may decide to change the studs for new. Obviously you'll need to replace any that break off, but you should inspect the threads to make sure they have not rusted away. New studs are included in the kit. You will have difficulty finding a 7mm stud puller locally. The best we've found is a Facom FA-287B.7 Cam/Roller Stud Extractor. This is available from on-line tool sources, and well worth the $40 or so investment. You can try vice-grips or the double-nut method, but both are depending on a relatively small area of the stud to grab. Once you have all the studs out, chase the holes in the head with a 7mm tap.
Step 4A - If you do break a stud off in the head, this is where things get difficult. You will need to carefully drill the broken steel stud out of the aluminum head, and then use a thread-repair insert to re-size the hole. Use brand new sharp drill bits. NEVER attempt to use an EZOut extractor, 99% of the time it will break off in the head and now you are trying to remove a piece of steel that is harder than your drill bits! You may use a Heli-Coil spring-type insert but a solid "TimeSert" is preferred. The size is 7mm x 1.0 and they will not be available locally. The most important part of this operation is drilling the old stud out. If you go off-center the new one will not fit the manifold. If you drill too deep, you will either put a hole into the cooling jacket (antifreeze will leak out) or into the cam area of the head (oil will leak out). This is NOT a good time to learn how to do this, if you have never drilled and rethreaded holes in aluminum, this is a good time to enlist someone with experience.
Step 5 - We strongly recommend that you have the manifolds resurfaced. The iron surface is typically burned away, and if you don't resurface the manifolds the gaskets are likely to blow out again in a few thousand miles. Ideally you will heat and remove the crossover studs and resurface the outlets as well. If the surfaces look OK, you should still check the manifold for straightness. The preferred method of resurfacing the manifolds is at a machine shop with a horizontal mill, but a belt sander can be effective. It is very important that the manifold be flat across all three inlets. Check this on a glass surface if possible.
Step 6 - After installing the new studs, put the gaskets in place on the head. Be sure that the gaskets are installed properly, as they will fit upside down but will block about 1/3 of the outlet. There is a small hole in each gasket which should be at the bottom when in place. Some gaskets come three-to-a-piece and must be separated from one another before you put them on. As of this writing the gaskets are supplied as three separate parts per side. You can use a small amount of high temp RTV to hold the gaskets in place (get the RTV sealant rated for the highest temperature you can find).
OPTION: It's good to note that the replacement Stage 1 Exhaust Kit GT100511 will eliminate almost all of the difficulties in the above process. NONE of the original parts are re-used, all the piping on the new system is stainless, and, most importantly, the engine flanges on the new exhaust are made and drilled to use all 4 of the mounting points on each exhaust port. This means that you have the option of using all 4 holes, OR using the holes opposite to the original manifolds meaning you can leave broken studs in place!
 Stage 1 Performance Exhaust Kit
Written by Warren Wallingford, DeLorean Motor Company (Texas)
Updated 6/8/2016 DAS [rewritten, links added]
Revised 1/13/2021 ET (formatting and links)